Thursday, February 4, 2010

Multi-grain Pancakes

Do you remember the first recipe I ever posted on this blog? It was for multi-grain waffles. It generated the same response from the four people who regularly read this blog: I don't own a waffle maker so could you please post a pancake recipe. Sure, I said. No problem. Coming right up.

Well, I hope you weren't waiting for it. When I said, "Coming right up," what I really meant was, "Hey, give me a year as I enjoy procrastination as much as the next person." After all this time, though, I am ready to unveil the super-duper multi-grain pancake recipe. I mean I went all out on this one. It took tons of time recipe testing and whatnot. Lots of flour spilled on the kitchen floor to alter that multi-grain waffle recipe. Here are the big changes: replace the oil in the waffle recipe with two tablespoons of melted butter and let the batter rest for 30 minutes before cooking. Yes, really, that's it. Is that a sigh of disappointment I detect?

If you've made pancakes before, you know that the telltale sign they are ready to be flipped is when the batter is covered in air bubbles. This action happens very subtly with these pancakes. See:


And from the side:

The outcome of few air bubbles is that you may have to lift an edge with your spatula to check the color before flipping the pancakes.

However, once flipped and properly cooked, slathered with butter and some local maple syrup (we use Remsburger), it is difficult not to devour these beauties.


That's right: I was so elated to have pancakes I dug right in and completely forgot to take a picture of them properly plated.


MULTI-GRAIN PANCAKES
Adapted from Eating Well magazine
Serves 2-3

1 cup buttermilk
1/2 cup old fashioned rolled oats
1/3 cup whole wheat flour
1/3 cup all-purpose flour
2 T toasted wheat germ
3/4 t baking powder
1/4 t baking soda
1/8 t kosher salt
1/2 t ground cinnamon
1 large egg, lightly beaten
2 T brown sugar
2 T butter, melted
1 t vanilla extract
Butter and oil for the pan

Stir the buttermilk and oats together in a small bowl (you'll add more ingredients to this mixture later). Let sit for 15 minutes.

In the meantime, whisk together the flours, wheat germ, baking powder, baking soda, salt and cinnamon in a large bowl.

When the oat mixture is ready, stir in the eggs, sugar, melted butter and vanilla. Add this wet mixture to the dry ingredients. Mix with spoon or spatula just until blended. You do not want to overwork the batter otherwise you'll have tough pancakes. Let the batter rest for 30 minutes. Go walk the dog, read the paper, catch up on e-mail. Walk away. Please. Really. It's for your own good: it leads to a much better pancake.

Preheat the oven to 200 F so you can keep the pancakes warm as you cook additional batches.

Heat a 10-inch or 12-inch pan to medium. Our stove settings are Low, 2-9, Hi. For this recipe, I heat the pan on level 5. When the pan is preheated, add approximately one tablespoon of butter and one tablespoon of oil. Swirl the pan so they mix together. If it seems like too much, pour some out and reserve it for your second batch. I portion the pancake batter using a 1/4 measuring cup which gives me three to four pancakes per batch. Cook until air bubbles form on top and the underside is a nice even brown (not light brown, not burnt). Flip. Cook an additional couple of minutes until evenly browned on the other side. Move to an oven proof plate or baking dish and hold in the warm oven while you cook additional batches.

Serve with butter and maple syrup or your favorite breakfast condiment.

Monday, January 25, 2010

54 Degrees at 7:30 a.m.

That's right. Monday was a rainy, windy, surprisingly warm day here in the Hudson Valley. As I am on the morning shift for the dog's walk, it was nice for once not to be greeted by bitter cold air. With bitter cold air, though, it's easy to know what to eat: hearty sausage rice soup, creamy hot chocolate, spicy penne all'arrabbiata. What does one eat in January when the weather screams April but without the wonderful April produce (asparagus, rhubarb, strawberries)?

Salad. Not any salad will do. It's still January so something substantial is required. Sure there can be lettuce, but we need protein, and fruit, and cheese! Hooray for cheese!

The source of this formula, as it's not a recipe in a traditional sense, is my Aunt Nancy. Aunt Nancy is a wonderful person who has come to be more than an aunt. She's the complete package: best friend, sister, and mother figure (but only when I need a good swift kick in the pants). She has been a major part of my life for as long as I can remember. The only solid holiday tradition in my life is Easter spent at her sanctuary of a home on Long Island. It is such a peaceful, relaxing space. We play cards and Scrabble, and eat well, incredibly well.

This past Thanksgiving we had the good fortune to spend it with her, my wonderful uncle Jamie, and my cousin Abbey. We have such a good deal going...we show up, we eat, we drink, we lay about, and we leave. Don't hate us too much as we have to navigate New York City traffic to get there. If you think, as I thought, that driving on Thanksgiving Day would make for light traffic that would be a mistake. At least twice per year for the last three years, we've made the round-trip drive from the Hudson Valley to Long Island (hello Throgs Neck Bridge!), and the worst traffic we've encountered in all those years was this past Thanksgiving Day.

It was with relief we finally arrived at their house, and then joy when we saw all the wonderful food being manipulated in the kitchen. For the salad course, Nancy said she was inspired by Primo restaurant in Maine. She placed all the components in front of me, and I was tasked with composing the salads.


A base of mesclun mix supported nearly equal amounts of prosciutto, goat cheese, mango slices, and fresh fig slices.


Oh my goodness - I am licking my lips just thinking about it as it was that good! The salt of the prosciutto would hit you only to be eclipsed by a little sweet-tart punch from the mangoes that would then settle into the creamy earthiness of the interplay between goat cheese and figs. This combination calls for a mild dressing and so Nancy made shallot vinaigrette.

Again, this is more of a formula than a recipe, and in addition to Nancy's wonderful composition, I have come up with few of my own. Amounts will vary based on use. For a salad course, each item, except the lettuce, should be around one ounce. However, I encourage you to play around and decide what works best for you. Regarding dressing, use your favorite recipe or brand. I've posted to links to some recipes I like.

SALAD a la NANCY
Mesclun mix
Fresh figs, sliced (depending on size, you'll need 1/2 to 1 whole fig per salad)
Goat cheese, crumbled
Fresh, ripe mango, julienned
Prosciutto, sliced
Shallot vinaigrette (recipe)

SPANISH version
Mesclun mix
Manchego cheese, thinly sliced
Serrano ham, thinly sliced
Fresh figs, sliced
Marcona almonds
Sherry vinaigrette (recipe)

ITALIAN version
Mesclun mix
Pecorino Toscano, shaved
Prosciutto, thinly sliced
Fresh, ripe pear, thinly sliced
Walnuts or hazelnuts, toasted
Red wine vinaigrette (recipe)

Thursday, January 21, 2010

Turkey Tacos!

Last week I stuck taco meat in my ear. This act, of course, was not intentional. I have yet to encounter the person who has done this and thought, "Well, what a worthwhile endeavor!" No, taco meat in the ear is a chunky version of a wet willy and undesirable on nearly every level.

How I came to have taco meat in my ear is understandable. I was eating a delicious turkey taco in a hard corn tortilla shell. As you know, when you are eating a hard shell taco, once you've committed to the first bite, you have committed to every bite thereafter until it is finished. On bite one, the shell breaks and only your hand is holding the whole contraption together. I always hold the taco in my right hand. I had not noticed that taco drippings had graced my left hand. My hair was not pulled back off my face and was itching my left ear. I could not afford to have an ear itch at this point as I had already committed to eat the entire taco. I used my free left hand to bring the loose hairs away from the ear. Then I felt it. That awful feeling of wetness in a location that should not be wet at that moment in time, and I discovered I had left taco meat in my ear.

I know you're wondering how I could possibly post a taco recipe after that story, but apparently I have no qualms about doing it. Brian and I eat turkey tacos on average every two weeks. They are incredibly simple to put together, fairly nutritious (minus the taco shell), and fast. I never tire of them, which is saying something because I have probably eaten tacos monthly since I've been eating solid foods (so 34 years give or take). When Brian and I first got together for the second time (long story), and I suggested tacos for dinner, he opened the cabinet and reached for seasoning mix. It is my love for this man that kept me from running out the door. It is his patience and openness to new things that allowed him to embrace my way of making tacos.

My disgust for taco seasoning mix at an early age was the first indicator I might adore food, its preparation and its consumption. I was at a slumber party at the cool girl's house. She also happened to be nice and inclusive which explains why most of our third grade class was there. The kitchen was open to the living area, and so while playing I watched her mother prep dinner in the kitchen. I saw her mother put seasoning mix in the taco meat. At first my objection was purely conjectural. My mother didn't use it and therefore it must be bad. Conjectural led to empirical because the first taste of the slumber party taco let me know that seasoning mix is evil.

My mother's blossoming into a fine cook took time, but her tacos were great from the very beginning (also known as my early years). She is an amazing person, a single mother who raised two children while still creating a professional life for herself. Tacos were one of her early successes in the kitchen. This recipe is hers.

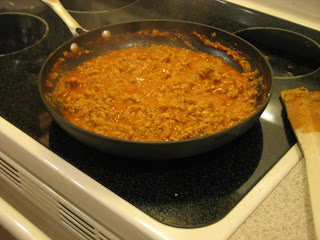
The taco mixture will seem too liquid at first, but keep simmering.

The mixture is done when there is very little liquid left in the pan.

TURKEY TACOS
Serves 3-4

1 medium yellow onion, diced
2 garlic cloves, minced
2 T canola oil
1 to 1 1/4 pounds ground turkey (or beef)
1 4-oz. can diced green chiles (I prefer the Hatch brand)
1 8 oz. can tomato sauce
1 t. cumin (I like cumin so I put in 1/2 T.)
1/4 t. cayenne pepper
salt and pepper to taste

Augmentations:
tortillas and/or taco shells
chopped tomatoes
shredded lettuce
shredded cheddar cheese
sour cream
hot sauce

Heat a 10 to 12-inch saute pan over medium to medium-high heat. Add the oil and swirl around the pan. Add the onions and garlic, and saute just until translucent. Add the meat and break it apart with a fork or spoon. Once the meat is broken up and fully mixed into the onions, add the green chiles, tomato sauce, spices, and salt and pepper. Let the mixture simmer down, which should take approximately ten minutes. Remember, you want very little extra liquid in the pan, otherwise you'll have taco meat dripping all over your hand.

While the taco meat mixture reduces, preheat the oven to 190 F. Warm up the taco shells and/or tortillas in the oven. When the meat is ready, put it in your vessel of choice augment with cheese, lettuce, tomatoes and/or hot sauce.

Saturday, December 5, 2009

Ice Box Cookies

At the end of October I went home to Colorado for the first time since I was married there last September. It is the only time I can remember a whole year passing in between visits, and I will not let it happen again. I need my Colorado time!

Even if the weather throws a curveball…you see within 30 minutes of landing at the Denver airport it started to snow. And it didn’t stop for 48 hours. This all would have been fine and good had I not been talking weather smack to my husband and touting Colorado’s 300+ days of sunshine. I extolled the virtues of a state with abundant sunshine and warm days thrown in for good measure in the middle of January. I reminisced about Christmas vacations spent sitting outside on my mother’s patio because it was 65 degrees. So two feet of snow at the end of October may be the meteorological equivalent of getting my due.

I did not mind the snow at all. It was lovely, fluffy dry snow. It gave me time to enjoy cable TV without excuse or guilt, bond with the dog, and peruse my mother’s treasure trove of a recipe file.

She handed me a badly damaged index card, water-stained and brown from age. I had to decipher the amounts of ingredients and experiment a little, but it was worth it for these:


These are ice box cookies. Mom tells me the recipe came from Mrs. Jarvis whose family was and still is prominent in Durango, Colorado. Well, all I can say is I am grateful she shared this recipe, which is perfect for holiday baking as you can make the dough ahead of time, freeze it, and then bake it when time permits. Not only are they easy, but they are absolutely charming. They hail from a different era as they are thin, delicate and crispy. They are not steroid-induced cake masking as a cookie that we encounter all too frequently today. They have a nice touch of spice that seems to be the perfume of holiday baking and would be a nice addition to any cookie tray. These cookies would also make a nice homemade gift.

Keys to success:
  • All ingredients should be room temperature, including and especially the butter.
  • Don’t overmix. Once you add flour to the dough, mix just until incorporated. Stop. Scrape the mixer, including the bottom of the bowl, Mix just a couple more seconds and stop.
  • If you have a warm kitchen, and the dough has gotten warm while mixing, stick in the freezer for 5 to 10 minutes before shaping it into a log/cylinder.
  • To shape into a log take one fourth of the dough and roughly shape it like a log in the middle of a piece of parchment. Fold the parchment over the dough and grab a cookie sheet. Using the edge of the cookie sheet pressed against the log, pull firmly on the top piece of parchment and the dough will roll itself into a more uniform log. Like this:


It’s snowing here. The first real snow of the holiday season. It’s time. Let’s bake!

ICE BOX COOKIES
By Mrs. Jarvis of Durango, CO

1 cup brown sugar
1 cup sugar
1 cup butter, at room temp

2 each eggs, beaten
1 t vanilla
½ t salt

2 ½ to 3 cups all-purpose flour
1 t cinnamon
1 t cloves
1 t nutmeg
1 t baking soda

1 cup pecans, chopped

Oven: 325 F

Cream together the sugars and butter until fluffy (scrape!). Add the eggs and mix until incorporated, scraping the bowl as needed. Add vanilla and salt. Mix until incorporated.

In a separate bowl, whisk together flour, spices and baking soda. Add all at once to dough and mix just until incorporated. Add nuts and mix. Stop.

Roll one-fourth of the dough into a cylinder on parchment paper. Repeat until all the dough is in cylinder form (see "Keys to Success" above for instructions on how to successfully roll a log). Refrigerate at least 12 hours or overnight. Or freeze, then wrap in plastic wrap and freeze.

If dough has been frozen, let sit at room temperature for 20-30 minutes until sliceable.

Slice dough into ¼” cookies and place on a parchment lined baking sheet.

Bake at 325 F for 12 minutes or until the bottoms are lightly golden brown.

Tuesday, November 24, 2009

No-Fail Cranberry Sauce

In June, several of my beloved cookbooks met their demise. I have not recovered from the loss. Every time my darling husband says it could have been worse and we didn't lose much I get a stinging sensation in my chest. While he's accurate on both counts, those cookbooks are a loss I feel over and over again. They were my diaries. Every recipe I tried I wrote the date next to the recipe with notes in the margin about successes, challenges and improvements for the next time. Often I noted which wine we drank with it.


One of the cookbooks that died was titled, I believe, Barefoot Contessa Parties! This week I miss that book, a lot. It contained the best cranberry sauce recipe I'd ever produced. I'd forgotten about this loss until I went to look for it this morning in an attempt to be ahead of the curve for the Thanksgiving meal. It was missing from the shelf. There's no time to order it, and yet I must have sauce for Thursday. What's a girl to do but create her own?!


I have some biases that color my recipe. First, I don't think the sauce should be overly sweet. It should be a nice balance of sweet and tart and even a little bitter to balance the other flavors on the table from turkey to sweet potatoes to stuffing. Second, it should taste fresh, really fresh. Freshness is achieved with citrus.


Third, it should have texture. I can eat smooth sauce when I am in the nursing home.


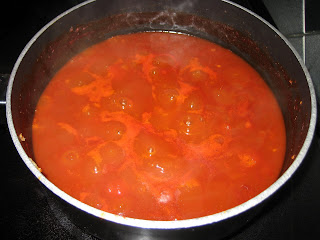
Fourth, the recipe should double or even triple easily, and this one does. Here's what a double recipe looks like before it is simmered. You'll want to cook this in a 4 quart or 5 quart stock pan.


Molly's No-Fail Cranberry Sauce
Serves 4

1 twelve ounce bag fresh cranberries (if desperate, frozen is fine).
1/2 to 2/3 cup sugar (sweetness is personal, add more if you like a sweet sauce)
1 lemon, zested and juiced
1 orange, zested and juiced
1 cup water

Combine all ingredients in a 2 quart saucepan. Bring to a boil and then immediately turn down the heat to low so that it softly simmers. If you don't do this step, the sauce will boil over in fairly short order. And no, that has never happened to me. Ever. Seriously. Simmer for 10-15 minutes. Time depends on thickness desired. Simmer it longer for a thicker sauce. Also, remember it will thicken as it cools. Once cooled, it can be stored in the refrigerator for up to a week.

If you want to take the sauce to the next level, add:
  • 1 tablespoon grated fresh ginger or 1/2 tablespoon ground ginger
  • pinch of nutmeg
  • right before serving, stir in 1/2 cup toasted pecans
  • 1/2 cup diced Granny Smith or Fuji apple
Happy Thanksgiving!

Thursday, October 22, 2009

RIBS!

Sometimes Brian and I run around the house, fists pumping, yelling "meat" over and over again. Yes, we really are that mature. We have a couple of recipes in the queue that cause us to do this jubilant shouting and high-fiving about meat. The one we use for ribs causes a ridiculous amount of euphoria, and perhaps, it is because the sauce is laced with bourbon.


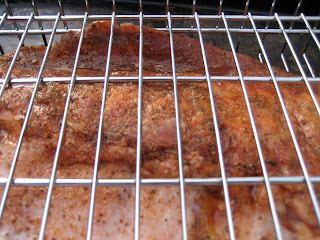
Or maybe it is the rub infused with brown sugar, paprika and celery seed...

Before you gasp in horror and report us for putting our meat in a cage, know that it is my inability to have my act together that caused the above photo to be our best one of the ribs, raw and covered with rub before we grilled them. The ribs are caged because we put them in our grill rotisserie basket and slow-roasted them for an hour. By we, I mean Brian. Tangentially, I've noticed if you want to make a man happy give him a grill.

This cooking method produces a very tender product, perfect for slathering with the bourbon-laced barbecue sauce.

Are you hungry yet? Good...here's the recipe.

Once you've printed out the recipe and given it due consideration, here are a couple of suggestions:
  • RIBS: You can use any type of pork ribs, including country style or baby back.
  • RUB: The rub has A LOT of salt. This is fine if you are only leaving it on the ribs for two hours before grilling. However, if you are letting the ribs absorb the rub overnight, then reduce the salt to 1 1/2 tablespoons.
  • RUB: Think of the amount rub as perfect for that amount of ribs. If you use a smaller amount of ribs, then reduce the amount of rub accordingly. For example, if you use only 2 pounds of ribs, then make only a half batch of rub.
  • SAUCE: Strained tomatoes, really Martha? To me, this is just extra work. Use crushed tomatoes...same amount.
  • SAUCE: You do not need to put the sauce in the blender if you don't want. It's lovely chunky.
Now, some of you are wondering why I would post a rib recipe in late October. It's 74 degrees today. If it were not, though, and if you enjoy grilling then weather is no object. Thus, a rib recipe such as this is worth braving the elements.

Thursday, October 15, 2009

The Bombs of Fall

When I refer to the bombs of fall, I am usually talking about color bombs. Autumn in the Hudson Valley is just as picturesque and breathtaking as you might imagine. One place to take in the fabulous color is at Kaaterskill Falls, New York State's highest waterfall:


Really, though, it doesn't matter where you are. The color is fabulous in front of a nearby gym:


And on the walking trail near our house:


We recently learned there is another bomb of fall. We moved into a new home this past June, a home graced with towering, yet lithe black walnut trees in the backyard. In mid-September, when the nuts were ready to separate from the trees, they had a nearly four-story fall onto our deck and into our yard. Boom! Boom! Boom! Over and over and over, for weeks on end.


At first, I would jump a little each time one of these suckers impacted. They break apart violently, and then immediately start to rot.


Look at this guy that hit our patio table at such a high rate of speed he has the table markings imprinted on his husk!


So I say get out there, enjoy the rich fall color, and wear a helmet!